Tuesday, December 21, 2010

Yorkshire Puddings Ala Edna - English Traditions Perfect Every Time!

Thanks to Edna - for this lovely method of making delicious, and traditional Yorkshire Pudding!

The beautiful Miss Edna!  Thank you for sharing so much with me!

Mmmm.... straight from the oven.  Believe it or not, this was my very first
attempt at making Yorkshire Puddings!
My husband is British by birth and even though he spent his years growing up in Australia, his parents never abandoned their British heritage.  There are arguments to be made - both pro and con - as to the appeal of British cooking, but there is no doubt in my mind that there are certain British dishes that are absolutely and solidly the best of the best.

One of those dishes is traditional Yorkshire Puddings.  My husband once asked me if I could make him Yorkshire Pudding, just like his "Mum" used to make.  Well, having never had her Yorkies, I told her about his request and she was happy to share her culinary secret to this delightful side dish that accompanies a Sunday roast or a holiday Prime Rib.  I knew it was going to be special - she's given me many traditional recipes in the past, including her DELICIOUS Sausage Rolls... so I had no fear in trying this simple method. 

WHAT'S THE SECRET?

Edna swears that the secret to perfect Yorkies is all in how you measure the ingredients, the heat of your tin and letting your Yorkshire Pudding batter rest for quite awhile on the counter before baking. 

The measure of eggs determines the measure of everything else.  She also said that there are a few other tricks that are well known to great Yorkshire Pudding chef's, but not as well known to those of us who have never prepared them.  A quick review:

FIRST:  The eggs.  Break your whole eggs into a measuring cup, and NOTE THE MEASURE!  If you break four eggs, you might get exactly one cup of eggs.  Now you know the secret... you'll need EXACTLY this measure for the flour and the milk.  A couple of pinches of salt and you're all set!

SECOND:  Mix the eggs, flour, milk and salt together and let your batter rest on the counter for at least an hour.. maybe two.  Aging the batter makes them bake up higher, lighter and more flavorfully!

THIRD:  Get your baking "tin" super hot and add just a touch of the fat from the roast.  I like to use a deep popover tin or muffin tin.  Some like to use an 8x8 baking dish (metal) or other style dish.. anything works as long as it is able to safely heat to 450 degrees.  Put your fat into the wells of each cup and place in the oven.  Give it about 10 minutes and get the tin smoking hot... you should see and smell the fat smoking.  Then quickly add the batter and let them bake - DO NOT OPEN THE OVEN!  


Turn the oven light on and watch these Yorkies bake..
it's more entertaining than an old Benny Hill episode!


THE INGREDIENTS AND INSTRUCTIONS:

This recipe makes enough for 6 LARGE Yorkshire Puddings.  Add more eggs if you want to make more.  Use two tins for 12 Puddings, etc... you get the picture.

BASIC INGREDIENTS - Whole eggs, all purpose flour, milk (I like to use whole fat) and salt

1.  Break three large eggs into a measuring cup.  Note the measure and pour the eggs into a medium bowl. 


2.  Next, using a dry measuring cup, measure the exact amount of flour as the measured eggs, add to the bowl.  Now, measure the exact same amount of milk.  In other words, if you had one cup of whole eggs, you'll need one cup of flour and one cup of milk. 


3.  Add a couple of pinches of salt and whisk well until all flour is incorporated into the eggs, milk and salt.  Set aside, cover lightly with saran wrap and allow the batter to rest for at least one hour.  (NOTE:  You can let it set for less time, but the rising and taste won't be as good, but they still are wonderful!)


4.  Preheat your oven to 450 degrees farenheit and prepare your deep well muffin tin.  There should be 6 to a tin.  Drop about 1/2 tsp of fat from a roast beef or bacon per tin.  You can use oil or shortening too... it just lacks in the meat flavor that makes Yorkies taste so great.  Do not use butter, it will burn at that temperature.


5.  When the oven has preheated fully... put the tin in the oven and let it heat for around 10 minutes or until your fat is starting to smoke slightly.  Carefully open the oven and ladle the batter in each tin.. about halfway up. 


6.  Bake for 20 minutes without opening the oven door.  Remove and serve immediately with your favorite meat and gravy.  Some people enjoy them cold with butter and sugar... it's up to you!

Saturday, October 16, 2010

Cactus blossoms and winter in the desert


Much to my surprise, this morning I woke up to find my new Saguaro Cactus in bloom. It's only one bloom, but one bloom is all it takes to make you say, "ohhhh, isn't this lovely?"

Friday, October 8, 2010

The Secret to Slow Roasted Turkey with Gravy

The Secrets to Slow Roasted Turkey with Gravy

It's been awhile since I've posted.  Where did September go?  It seems like fall sneaks up on me living in Arizona.  We've just waded through weeks of 110 degree days.  Hardly the type of weather that brings to mind Fall and Thanksgiving.  But I was at the grocery store yesterday and saw the most beautiful pumpkins and suddenly, I was in the mood.  I remembered this method some time ago about cooking a turkey.. rather, slow roasting one.  I found something very similar from Cook's Illustrated... one of my favorite cooking sites.

I wanted to share this with you all and hopefully you will enjoy cooking your holiday bird in a new way.  I suggest to those that like stuffing... make it on the side.  Besides, who wants all that internal grey matter floating around in your stuffing?  I don't!  I think that's why I never cared for it as kid.. internal grey matter is gross.. and even at my age, it's still gross! 

C'mon Fall!  Let's get grooving with the menu planning.  In my new neighborhood.. I think I'll bake up a variety of things for my new neighbors.. do you think they will eat it or do you think they will toss it in the trash?  Who knows... who cares.  I do it because I want to.  Be nice to your neighbors this holiday season.  Times are tough.. and we can all use a smile.


This method was on a recent episode of America’s Test Kitchens and I thought it would be a great way to use a frozen turkey breast I had in the freezer.  Boy.. it was fantastic!  I’ve decided to do a whole turkey on Thanksgiving this way and what a fantastic way to cook a bird!
Slow roasting ensures the ultimate in juicy, tender and flavorful turkey.  The gravy is the best turkey gravy I have ever had!  You can adjust your seasonings to what you like.. adding a touch of sage to the fresh veggies or go with the recipe as suggested by ATK.  Here is a link to the video in case you want to watch how Chris Kimble demonstrated the roasting of a turkey. 
LINK TO VIDEO, CLICK HERE! 
Ingredients:
·         1 Whole Turkey, or a culmination of breast and parts, purchased separately.  (See note about turkey)
·         3 onions
·         3 ribs celery
·         2 medium carrot
·         5 cloves of garlic, cut in half
·         5 sprigs of thyme.
·         3 TBS melted butter
·         1 TB salt
·         2 ts black pepper
·         3 TBS butter
·         3 TBS flour
·         2 bay leaves
Directions:
Chop onions, carrot and celery.  Place all veggies in a large baking sheet, spread out evenly.  Add sliced garlic and thyme evenly over the top.  Place a cookie cooling rack over the top of the veggies and add 1 cup of chicken broth over the veggies.  The rack will hold the turkey and as it roasts, the juices from the turkey will integrate with all the roasted veggies.

ABOUT  THE TURKEY!  NOTE!  Do not purchase a pre-brined or pre-tenderized turkey.  Avoid Butter injected turkeys.  These contain high amounts of salt and fat and the salt from brine will mingle with your veggies and your gravy will be far too salty.  A natural bird works best!
If purchasing a whole bird, remove the legs, thighs and wings using a sharp knife.  Leave the breast whole.   If purchasing turkey in parts, assemble your parts on the rack.  Baste all the parts with melted butter and season with salt and pepper.  Place the breast skin side down over the rack.  Place the cut parts (thighs, wings and legs) skin side up alongside the breast. 

Roast, uncovered in a very low oven at 275 for one hour to start.  After one hour, remove from oven and flip breast over.  Bake for one more hour approximately or until breast meat registers 160 F degrees using a digital thermometer.  Check the temperature of your thighs, they should be anywhere from 170 F to 175 F.  Once temperatures have been reached, remove the entire cookie cooling rack with turkey to a clean baking sheet.  Turn up the temperature of your oven to 500 degrees.  Let turkey rest until oven is fully preheated.
MAKING THE GRAVY:
Place a strainer over a large heat proof bowl.  Carefully pour veggies and broth via strainer into the bowl and using a large spatula, press the veggies against strainer to release all juices.  You want about 3 cups of broth and if you’re short, add some chicken stock to your measure until you get three cups of liquid.
In a large saucepan over medium high heat, melt 3 TBS butter.  Let foam dissipate.  Add 3 tbs all purpose flour and stir till golden brown – about 5 minutes.  Slowly add ½ cup of the liquid and whisk briskly to avoid lumps.  Once ½ cup of the liquid is mixed in, you can add the rest, whisking through to the end.  Add two bay leaves and bring broth to simmer until nicely thickened.  Simmer about 15-20 minutes.  Turn off or keep warm over very low heat. 
While gravy is simmering, re-roast your turkey in the 500 degree oven until skin is nice and crisp.  About 15 minutes.  Transfer all pieces to a cutting board and let rest for 20 minutes before carving.  You can pour any remaining juices from the high roast into your gravy. 

Slice and carve your turkey and serve with the gravy. 

Tuesday, August 31, 2010

Sweet Dough with Richard Bertinet - Video Link

So I was on my favorite baking site - the place where I've learned most everything I know about baking - The Fresh Loaf and I saw this off chance post about this French Pastry Chef, Richard Bertinet.  I clicked the link to watch his video on how he made sweet dough and it just blew my mind.  Check out the link below from Gourmet.com and just watch this guy work this dough.  Magical!  I can't wait to try it.

Magazine: Gourmet.com


Sweet Dough
Makes enough for 2 large loaves or 12 individual pastries
Active Time:15 minStart to Finish:1 1/4 hr
ADAPTED FROM DOUGH: SIMPLE CONTEMPORARY BREAD BY RICHARD BERTINET


You’ll see this dough—essentially what’s known as pain viennois—all over France as an alternative to brioche. In addition to the variations below, you can make small baguettes, slice them in half horizontally, and slip a thin bar of good chocolate inside for a very French after-school snack. We can’t emphasize enough that you shouldn’t be alarmed at the wetness of the dough. Don’t try to knead it with the heel of your hand, but simply work it as shown in the video (SEE LINK ABOVE PICTURE!), and you’ll be rewarded with a satiny, springy dough that is, as Bertinet would say, “full of life.”


1 cup plus 2 tablespoons whole milk
1 (1/4-oz) package active dry yeast (preferably Red Star or Saf; not rapid-rise)
1 lb 2 oz bread flour (about 3 3/4 cups)
1/2 stick unsalted butter, softened
3 tablespoons superfine granulated sugar
2 teaspoons salt
2 large eggs


Equipment: a flexible plastic bowl scraper

•If using fresh yeast, heat milk until just warm. If using dry yeast, heat milk to 120 to 130°F.

•Rub yeast into flour in a large bowl, then rub in butter. Stir in sugar and salt. Fold in milk and eggs with bowl scraper, rotating bowl, until liquid is absorbed and a wet, sticky dough forms. (Dough will be wetter than most you’ve encountered.) Scrape dough out onto an unfloured surface. (Dough will be a sticky mess. Don’t be tempted to add more flour. By working the dough through a process of repeatedly stretching and folding it over onto itself, trapping air, dough will become cohesive and supple.).

•Slide your fingers underneath both sides of dough with your thumbs on top. Lift dough up (to about chest level) with your thumbs toward you, letting dough hang slightly. In a continuous motion, swing dough down, slapping bottom of dough onto surface, then stretch dough up and back over itself in an arc to trap in air. Repeat lifting, slapping, and stretching, scraping surface with flat side of bowl scraper as needed, until dough is supple, cohesive, and starts to bounce slightly off of surface without sticking, about 8 minutes.

•Transfer dough to a lightly floured clean surface. Form into a ball by folding each edge, in turn, into center of dough and pressing down well with your thumb, rotating ball as you go. Turn ball over and transfer to a lightly floured bowl and cover with a kitchen towel (not terry cloth). Let rise in a draft-free place at warm room temperature until doubled, about 1 hour.

UPDATE:  The results were far beyond my expectations.  Truly magnificent rolls and I can't wait to make them again.  Only this time, I might experiment with doughnuts using this dough.  In addition, this method of mixing and kneading can be adapted to just about any bread style.  I can't wait to try more!


Prebake rolls - half pecan half "nut less"


Thursday, August 26, 2010

Oh These Amazing Buns! Spectacular no?? Oh yes!!!

I have been making my signature Hamburger Buns for a long time.  In fact, I have the recipe published on AllRecipes, called Belles Hamburger Buns.  I've set out for the past couple years improving those buns and I think I've found the right balance.  Thanks to King Arthur Flour for the base recipe, I've made a few adjustments and find that these are just about perfect every time!

A light, gorgeous, feathery soft crumb, but a bun firm enough to hold a hamburger.  The oven spring on these buns is just phenomenal and the smell of them baking is enough to make your heart flutter!  I like to double this recipe and give a half dozen away to a friend of ours with a young family.  The below is the doubled version - oh yes, they do freeze well.   I don't put sesame seeds on a few of them, just in case their kids are a bit fussy - but you could put anything on these you like.  From coarse sea salt to poppy seeds or even some "everything" bagel toppings.  The sky is the limit!


The oven spring is fantastic in these rolls!

Enjoy them! Tonight, I'm making Sloppy Joes and Belgium Frites.... ooooh, so good!

Belles Hamburger Buns - Part Deux
Makes 12 Buns

6 ounces lukewarm water
6 ounces of lukewarm milk
2 large eggs
2 ounces butter, softened
2 ounces, sugar
4 teaspoons instant yeast
2 teaspoons salt
11.5 ounces Unbleached All-Purpose Flour
11.5 ounces Unbleached Bread Flour

For the topping
1 large egg, beaten with 1 TBS water
Your choice of sesame seeds, poppy seeds, the sky is the limit!

Directions

1) To make the dough: Combine all of the dough ingredients, and mix to make a soft dough.  Knead dough for at least 5-8 minutes using the dough hook.  Dough should pass the window pane test.

2) Place the dough in a lightly greased bowl, cover, and let it rise in a warm place for an hour, until it's almost doubled in size.

3) Turn the dough out onto a lightly greased surface, flatten it slightly, and divide it into 6 pieces, each weighing about 3 1/2 to 4 ounces.

4) Roll each piece into a tight ball and using a floured hand, gently flatten them on a cookie sheet lined with parchment paper.

6) Cover and let rise until the buns have doubled in size. Towards the end of the rising time, preheat the oven to 375°F.

7)  Combine egg and water and lightly brush each bun.  Sprinkle topping on immediately.

8) Bake the buns, one pan at a time for 10 minutes.  Rotate the pan and bake for about 6 minutes more.  Cool on a wire rack.


Ancient Bakery Discovered in Egypt

The smell of freshly baked bread wafted through Egypt’s western desert more than 3,500 years ago, according to new findings at the El-Kharga Oasis announced on Wednesday.


During excavation work for the Theban Desert Road Survey, a project to map the ancient desert routes in the Western desert, a team of Egyptian and US archaeologists from Yale University stumbled upon the remains of what appears to be an ancient bakery town.


About 1 km (0.6 miles) long from north to south and 250 meters (820 feet) wide from east to west, the settlement dates to the Second Intermediate Period (about 1650-1550 B.C.).


According to John Coleman Darnell, who led the Yale mission, archaeological evidence indicates that the site was an administrative center along the bustling caravan routes which connected the Nile Valley and the western oasis with points as far as Darfur in western Sudan.


Indeed, the archaeologists unearthed large mudbrick structures similar to administrative buildings previously found in several sites in the Nile Valley.


But the most interesting features were the remains of a bakery. Making bread on a massive scale was the main occupation for the majority of the inhabitants, said Zahi Hawass, the head of Egypt's Supreme Council of Antiquities.


The archaeologists unearthed two ovens and a potter’s wheel. This was used to make the ceramic bread molds in which the bread was baked.


The large debris dumps outside the bakery suggests that the settlement produced bread in such large quantities that it may have even been feeding an army, Hawass said in a statement.


Early studies on the site revealed that the settlement had quite a long life. It began during the Middle Kingdom (2134-1569 B.C.) and lasted to the beginning of the New Kingdom (1569-1081 B.C.).


However the site was at its peak from the late Middle Kingdom (1786-1665 B.C.) to the Second Intermediate Period (1600-1569 B.C.).

Friday, August 20, 2010

Back to School! Or, a visit with the Cafeteria Lady and her rolls!

Posting that Pot Pie recipe made me hungry for Pot Pie and I've decided to make that tonight, even though it's supposed to be 110 degrees.  Sometimes living in Arizona can be unbearable, so it's a good thing we love living here! 

To add to my torment, I'm also whipping up some fun rolls that bring back all kinds of memories for me.  This recipe has a fun history in how I discovered it.  My in-laws were visiting from Australia and we decided to take them on a road trip to Yellowstone National Park.  They are huge garage sale hounds and on the way back, in Ennis, Montana - we noticed a garage sale sign.  My father in law, who wears prescription lenses, thinks buying old eyeglasses is the best thing since sliced bread.  He will buy 2 or three pairs at garage sales and hang onto the frames, just in case he needs a new pair.  I always tell him that they were probably the glasses of some dead guy, but that doesn't seem to rock his reality.  I try not to tease him too much since I'm married to their only child!

Anyway, I found this old notebook at this garage sale and when I opened it, there were hundreds of old recipes, written on tattered pages, recipe cards, backs of envelopes and beautiful personalized stationary.  It was $1.00 so I bought it and we left for home.  While riding in the car, I started thumbing through it and realized I was sitting on a virtual treasure trove of family heirloom recipes.  Many of the recipes were for families and average portions, but some I noticed were for massive portions - like 300 servings, etc.  I quickly realized that I had purchased a recipe book from a school cafeteria lady! 

Immediately, my mind raced as I recalled all the old memories from school lunchrooms.  We didn't have alot of money growing up, so buying lunch was a once weekly treat.  Most of the time our lunches were packed so to get a lunchroom meal was fantastic.  One day I always asked for my lunch treat was on ROLL DAY!  You know the ones, the gorgeous, yeasty, gargantuan rolls that were served with lunch.  Oh they were good!!  Always hot and loaded with flavor. 

Lo and behold.. in my little notebook was a recipe for Yeast Rolls from Ennis School District, Madison County Montana.  All I know is those kids were lucky to have these.  I always wondered what it must have been like, cold as a witches nether-regions and the taste of a hot roll to warm the soul.  I've made them many times and they are so good.  This recipe is scaled back from a recipe that made 5 dozen rolls!

Lunchroom Lady Rolls
Courtesy:  Ennis School District
Makes 16 rolls

INGREDIENTS:

4 Cups of flour (17 ounces) (I am assuming the ladies used AP Flour)
2 tablespoons yeast
1 tablespoon salt
3 tablespoons sugar
1/2 cup melted shortening, cooled (may use butter)
1 3/4 cup warm milk

Unless you're using active dry yeast, just mix everything together.  If you're using active dry yeast, mix the yeast in the milk until it begins to foam.  In a Stand mixer bowl, combine all the ingredients and mix well.  Use a dough hook and mix for several minutes until the dough is smooth and silky.  It will be quite sticky, but that's OK.  It should pull away from the side of the mixing bowl, however.  Add more flour if necessary in order to achieve that.

Let dough rise until doubled in a covered and greased bowl.  Stir down dough and form into rolls with well-floured hands.  Place them in a 9x13 metal pan, sprayed with PAM.  Cover with a tea towel and let rise again.  Bake at 425 degrees until browned nicely.  Brush with butter and let cool on a wire rack.

Note: the lunchroom lady didn't say how long to bake them, so you be the judge.  I usually let mine go until they reach 200 degrees by thermometer.  Around 20 minutes.

Roaster Chicken Pot Pie With Puff Pastry - Made Simple, Cheap and Delish!

I don't know about you, but sometimes my cooking gets into a rut.  Sometimes we get a little tired of discovering all our exotic dishes and we like to have comfort food.  Just something simple and satisfying, yet easy to make, affordable and absolutely delicious!  The one dish that most always comes to mind for me, is Chicken Pot Pie!

One of my favorite kitchen devices is a Pressure Cooker.  I actually have two.  One of them I use for breaking down bones into broth.  I will sometimes get a natural chicken on sale at the store, chop it into 4 big pieces and just throw the whole thing in my Pressure Cooker, along with aromatic herbs and some veggies for flavor.  20 or 30 minutes under pressure, a strain into a container and you've got some incredible, flavorful broth.  You can't recreate that on the stove top quite as easily, or as quickly!

Our family does alot of shopping at Costco, but one of our favorite pick up items there is one of their Roast Chickens for $4.99.  You can make this recipe with one of your own roast chickens and it will work just as well.  However, Costco brines their chickens for tenderness and flavor and whatever spice combination they use on them - well, my husband and I just love it. 

Since there is usually just two or three of us eating, we can use a Costco Chicken one night for grilled chicken panini sandwiches or the Hubs fav.. chicken and avocado sandwiches.  We usually have half the chicken left, all the carcass and ALL THAT FLAVOR!

Here's how I whip up my Roaster Chicken Pot Pie with Puff Pastry.  This dish costs all of $7 or $8 and it's totally delicious!

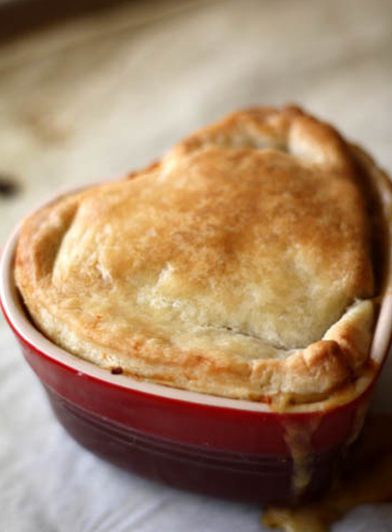
NOTE:  The below recipe makes 4 individual pot pies (depending on dish) or a 9 inch deep dish pie.  I like these cute dishes from La Crueset, but I'm still unpacking and can't find them, so I used something different.

These cute LaCrueset dishes can be bought on Amazon for like $20/each.  I love them for French Onion soup or these individual casseroles.  Also nice for individual deserts like cobbler.  Careful, they chip easy though, but are hearty enough to stand up to the broiler or the refrigerator.

You can double it to make a large casserole if you wish.  Just know that when you make it in a pie dish or a large casserole, your puff pastry doesn't come out nearly as nice.  Too much steam from a large casserole retards the crust browning perfectly.  However, you can do it - just double all the ingredients and use a larger casserole dish.  You may need to use both pieces of puff pastry in order to fit a 9x13 dish or other.  Just pinch them together if you want for a bigger piece.  If you prefer pie crust, go ahead and use it.  If you want a bottom crust, pre-bake it in the oven beforehand. 


It doesn't matter what you bake them in, they are still good! 

INGREDIENTS:

1 Roaster Chicken - use half the meat, all the carcass (bones and skin) for a small casserole, or if you want a large casserole, use all the meat and double the ingredients below.  Pull all the meat off and set aside
1 14 oz can low sodium chicken broth (optional)
2 tablespoons olive oil or veg oil
1 cup diced onion
1 cup diced carrot (1/2 inch slices or chunks)
2 cups diced potato (1 inch size cubes)
1 cup frozen peas
Salt & Pepper to taste
1/2 to 1 tsp poultry seasoning
1 teaspoon garlic powder
4 tablespoons butter or olive oil
4 tablespoons flour
1/2 cup heavy cream
Anything else you like in a good pot pie
1 sheet frozen puff pastry, rolled out slightly to fit your dish

If you don't have a pressure cooker, don't worry.  Your simmer times will be longer, however.  If you have a pressure cooker, use it.  This recipe is my method using the Pressure Cooker, so adapt it for your slow pot using common sense and the tips I provide here.

Remove the meat from your roaster chicken and set aside, saving all bones and skin.  Break apart the main chicken carcass into large pieces.  In a pressure cooker or dutch oven, add 2 TBS oil and heat over medium heat.  Add diced onion and stir constantly until onions are translucent.  About 3-4 minutes.  Add bones and skin of chicken and stir for a few minutes.  This helps to impart more flavor from the bones.  Add the chicken broth and enough water to just cover all of the carcass pieces.  Lock your lid into place and raise the heat to high.  When your cooker pressurizes, lower the heat to simmer and begin to time your pressure cooker.  I like to give it 25 minutes under pressure.  When done cooking, turn your heat off and let your pressure cooker de-pressurize on its own. 

NOTE:  If making in a stock pot, simmer all bones, broth and water in a covered pot for about an hour.

While your pressure cooker is in de-pressurizing mode, dice your potatoes and carrots.  You can also dice some celery or other root veggies if you like.  Keep the sizes of the pieces fairly consistent.  While your at it, dice enough of the chicken for this dish, but keep it seperate from the veggies for now - we will add it later, along with the peas.

When your pot has fully depressurized, remove the lid and strain out the bones and skin and saving all the broth in a large heat-proof bowl.  Set it aside and discard bones, skin, etc.  Using the same pot or pressure cooker, add 4-5 cups of the chicken broth back to the pot and add all your veggies, except for frozen peas.  Bring the pot back to pressure and reduce the heat to start simmering.  Let it simmer for about 5 minutes. 

HINT:  You just inherited the best chicken broth ever!  Save the broth to a storage container for later use.  Great for soups, gravies, etc.  Keep the bowl, don't bother washing it out, we'll be using it next!

NOTE:  If using a regular stock pot, cover pot and simmer vegetables for about 10 to 15 minutes until tender.

Bring the pressure down quickly in your pot by running cold tap water over the top.  Within a few seconds, the pressure will quickly drop and it's safe to open the lid.  Carefully pour the contents of the broth and cooked veggies to that broth bowl you used earlier.  Next, add your cut up chicken and those frozen peas to the bowl with the broth and veggies.  Set aside. 

Now, back to your empty pressure cooker!  Heat the cooker over medium heat (maybe a bit higher if you're impatient like me!) and slowly melt the butter or add the olive oil to make the roux.  When the butter is melted, sprinkle the flour over the butter and stir with a wire whisk over medium heat until the consistency is like peanut butter and the flour/butter begins to brown nicely.  Lower your heat just a bit and slowly add the cream and all your spices. (BEFORE ADDING MORE SALT:  Make sure you taste the final broth for saltiness!  Some roaster chickens are very salty coming from the store and you may not need to add extra.)  Stir well with a wire whisk.  Next, add the broth with the chicken and veggies.  Stir gently and allow to simmer until thickened.  If you want your sauce thicker, just mix together some oil and flour in a small bowl and add the paste to the sauce a bit at a time until you achieve the right consistency.  You can also add cornstarch and water mixed together for another quick thickening option. 

Preheat your oven to 425 degrees.

While your base is thickening, prepare your ramekins or deep dish pie pan.  I like to spray mine with PAM before filling.  Next, roll out your puff pastry on a lightly floured surface to ensure that it will fit over the pie pan, or cut it into 4 squares to fit over each ramekin.  Depending on dish size, you may or may not need to roll out.  I don't cut mine into a circle, I just lay the entire square on top and let the corners fall over the sides.  These corners puff and brown beautifully in the oven and is good to pick off the sides and add to your plate!

Carefully ladle your filling into the ramekin or pie dish, filling it nearly to the top.  Lay your puff pastry over the top of the dish and cut a few slits in the top to allow the steam to escape.  Put your ramekins or the entire pie on a cookie sheet and bake for 20 minutes or more until your pastry is a rich, golden brown. 

Serve and enjoy this great meal under $10!

Friday, August 13, 2010

Grandma A's Ranch Hand Bread

This is a great recipe that I've been working on for a few years.  It means a great deal to me to share it with you. 

My Mom grew up on a working ranch just east of Missoula, Montana.  Being one of 9 children, she often times shared many special memories.  My Grandmother used to bake bread every day and during the height of ranching season, she'd have to bake for not just the children, but for the hands as well.  She told me once that she'd bake up to 20 loaves of bread.  Her day would begin at 4AM and what makes this story even more amazing is that she baked them using a wood fired oven! 

She baked this bread so ofen that of course, any handwritten recipe she may have used has long since disappeared.  The magic and the formulas tightly held within her mind and her heart.  Whenever I'd ask, her answer was always the same, "A little of this and a little of that.  Your dough will tell you when you have it right."  Now she's gone and I've tried my best to recreate what I think is the perfect loaf.  Try it and let me know what you think.  It's easy, it makes alot of bread and your family will love it.

Grandma Anderson's Ranch Hand Bread
Yield:  3 Loaves

INGREDIENTS:

All Purpose Flour - (4 Cups / 1 lb. 4 oz / 566 grams / 940 ml)
1.5 tablespoons instant yeast
3 tablespoons sugar
3-4 tablespoons melted butter, cooled or canola oil
4 cups milk, heated to lukewarm
Bread Flour - (5-6 Cups / 1 lb. 13 oz / 825 grams / 1410 ml)
1.5 tablespoons salt

DIRECTIONS:


Add AP flour, yeast, sugar to a large mixing bowl or to the bowl of your stand mixer. Mix together well. DO NOT ADD SALT, WE ADD IT LATER! Using the paddle attachment of your mixer, mix together milk and melted butter until dough forms a smooth batter, much like a pancake batter. Some lumps are OK.

Next, attach the dough hook and begin adding your bread flour one cup on Speed 2 at a time until each cup is well incorporated.  Reserve one cup of the flour and only add it if your dough continues to act too sticky.  If it is, add remaining flour a few TBS at a time until the dough pulls away from the sides of the bowl.  It should still act sticky on the bottom of your mixer.

Turn your mixer off and let your dough rest for about 15-20 minutes.  I like to leave the dough hook in the dough and cover it with a tea towel.

Turn your mixer back on to Speed 2 and SLOWLY sprinkle the salt into the dough.  Let your dough hook work the salt into the dough until it is smooth and elastic.  Check your dough to see if you have kneaded long enough by conducting a "window pane" test on the dough.  You should be able to cut off a small chunk, pull it slowly apart with your fingers and the dough should not tear.  The dough should be thin enough to be somewhat transparent - like this:


TIMING:

The dough can take anywhere from 45 minutes to over an hour to rise, depending on how much yeast you used. Start watching it after 30 minutes though, I cut back on the yeast to just over a TBS for this recipe today and I was shocked at how quickly it rose in my doubler!! Less than an hour and it actually rose too much. It tripled, not doubled! LOL


My handy dandy "dough doubler" that I bought from King Arthur Flour.  Besides my dough scraper, this is the best device I've ever owned.  I have two now - a small and a large one.  This is the large.  Buy one for yourself by clicking here!

SHAPING, RESTING and BAKING


Now that your dough has doubled in size, lightly flour your counter and dump your dough out. Using your fingertips, gently remove all the air bubbles and mass that has developed as it has been rising. Now, gather your dough into a rough log shape and divide your dough into three equal pieces. This is where a scale comes in quite handy once again! You can weigh your large piece of dough, divide by three (if making three loaves) and you an cut your dough with a sharp knife or dough cutter and weigh each individual piece. This assures you that your bread will be consistent in size. 


Weighing each piece assures consistency in your loaves.  NOTE:  Use one for dinner rolls or even roll it out for some cinnamon rolls.  While not traditional "Sweet Roll" dough, it still makes for yummy, soft cinnamon rolls!

Prepare 3 bread baking pans (standard size is 8.5 x 4.5) by spraying them generously with Pam or greasing each one very well. Set them aside. Roll each dough into a ball and set aside. Using a rolling pin, gently roll out the dough no wider than the width of your pan, and about 10-12 inches long. Begin rolling up the dough into a tight roll and pinch the seams together at the ends and on the long section of the dough.


Push out the bubbles gently so that there are no large airholes in your loaves.

Pinch the seams shut with the side of your hand and pinch each end seam closed.  Tuck the end under slightly before putting in your bread pans for the final rise and baking.
 Place in a well-greased bread pan, seam side down. Repeat with the remaining dough balls and then sprinkle each loaf generously with flour, cover lightly with saran wrap and a light towel. Let your loaves rise in your pans until they dome over the top and are well doubled. This usually takes anywhere from 30 - 60 minutes.

About 15 minutes before baking, preheat your oven to 375 degrees.  Keep a close eye on your loaves, make sure your dough doesn't rise too much, or you will lose some dough mass and height. In fact, an overly risen loaf can collapse on itself and there is no getting back what you just lost. Bread still will taste good, but you will lose texture and density will be quite high.  Bake them for about 35 minutes - turning half way for even browning.

The loaves are risen quite enough.  You will get a nice big ovenspring with this bread recipe, so expect more rise in the first few minutes of baking!

Cool the loaves on a wire rack.  If you want a softer crust, brush them lightly with butter.  Cool at least 30-40 minutes before slicing.  I know, it's tempting!!  The aroma of these loaves is unbelievable.. delightful and sublime!

Sometimes I almost hate to brush the tops with butter.  I love that "floured" look on the tops of loaves.  You can easily leave the melted butter off of these loaves.  They soften up very nicely while cooling.  The loaves also freeze well and stay nice and fresh for up to 30 days.