Tuesday, April 24, 2012

Scottish Shortbread Ribbon Cookies

These great cookies are my husband's favorite. I first made them for the holidays a few years back. I had planned on making several platters and was busy adding cookies to my collection. I thought I had been drinking too much egg nog because I could swear that these cookies kept disappearing. I finally figured out it was my husband, sneaking out into the garage freezer, snagging a few of these when I wasn't looking. Finally, I had no choice but to make another couple batches to make up for all that I had lost.

But who could blame him? These cookies are that good! Rich, delicate.. gorgeous flaky shortbread. They taste as good on day 3 as they do on day 1.. so they will keep or freeze well. They are super easy to make and they will be a favorite on your cookie platter.. no matter what time of year!

A few quick hints about these cookies:

One major precaution on these cookies. If you make your indentation too deep, there is not enough cookie base to hold the cookies together.. so make your indentations slight. I like to use the plastic tube from a candy thermometer. I just lightly flour it and roll it slightly back and forth while pressing down gently.

Also, the original recipe calls for baking your cookies for 10 minutes before adding the jam and baking a further 15 minutes. But I was yammering away on the phone one day and accidentally added my jam at the very beginning. Either way it works out. Adding your jam according to the recipe gives your jam a more fluid, less cooked texture.

Make sure your dough is not too warm going into the oven. All that butter makes the cookie spread, so I like to chill my dough before baking for about 30 minutes. It seems to help them bake up and maintain a better shape.

SCOTTISH SHORTBREAD RIBBONS
Makes 36 Cookies

The cookie:
2 1/4 cups all purpose flour
1/2 tsp baking powder
1/2 tsp salt
1 cup (or two sticks) unsalted butter, softened
1/2 cup sugar
1 whole egg
1 tsp vanilla
1/2 cup of your favorite jam

Icing drizzle:
1 cup powdered sugar
1/2 tsp vanilla
2 TBS Sweetened Condensed Milk
1-2 TBS whole milk or half and half

Preheat oven to 350 degrees. Prepare two large cookie sheets by lining them with parchment. Set aside.

In a medium bowl, quickly whisk together the flour, salt and baking powder. Set aside. In the bowl of a mixer, cream butter and sugar together and beat for about 4 minutes on high speed. Add egg and vanilla and mix in well. Use a spatula to keep the sides of the mixing bowl clean. Slowly, add the flour mixture in three batches, mixing well in between each batch.

Turn out dough onto lightly floured surface and divide into four equal pieces. Shape each piece into a log and gently roll until it is approximately 10 inches long. Place the log on the cookie sheet and parchment paper. Using your fingers, gently press down the log until it is about 2 inches wide and 1/2 inch or so thick. Make a slight indentation all the way down the middle of the log. Indentation should be about 1/2 inches wide (I use an old, plastic tube from a candy thermometer). Repeat with remaining dough. You should have four logs of cookies ready to bake. Chill the pans in the refrigerator for about 20-30 minutes while the oven preheats. The slightly chilled dough makes the cookie spread less when baking.

Bake cookies, one sheet at a time, for 10 minutes. Remove first sheet from the oven and begin baking the second sheet for 10 minutes to set the cookie. While the second sheet bakes, fill the indentation of the first cookie batch with jam. Set aside. When the second sheet has finished baking, remove it and fill with jam. Bake the first sheet for 10-15 minutes or until the edges of the shortbread are lightly golden brown. Repeat with second sheet.

Let cookies cool for about 10 minutes right in the pan. Using a sharp knife or a dough cutter, slice the cookies in 1 inch widths.. about 9 cookies per log. Try not to move them too much, they are super delicate when warm. Let them continue to cool while you mix the icing together.

In a small bowl mix powdered sugar, vanilla, sweetened condensed milk and 1 TBS of cream. Mix together swiftly with a fork. If the icing is not quite thin enough, add a bit more milk or cream. It shouldn't take more than 2 TBS. Drizzle the cookies using the tines of the fork with the icing. Be generous - these cookies are not overly sweet and the icing is the perfect compliment.

Enjoy!

Mum Edna's Potato Pancakes

Potato Pancakes on the griddle
My Mother-In-Law makes wonderful potato pancakes.  My husband swears they are the best and I'd have to agree.  They are plain, make no doubt about that - but that's the appeal of them. 

I did alot of research on trying to find this recipe.  Getting one from Edna was like pulling teeth.  Her directions to me were, "Well, just boil some potatoes and smash them with flour."  Right!  While they are nearly that simple, there is a bit more to them.  Adding too much flour makes them dry and they won't hold together nicely.  Too little, or not cooked properly, makes them doughy and rather unsettling.  There are no exact measurements here, but I'd say roughly, expect to add a cup or two of flour to 3 or 4 medium sized boiled potatoes.  You want the dough to be slightly sticky, but still able to be handled without much fuss.  The gluten should develop and hold together nicely.

So, when we visited Australia this year, I asked Edna to demonstrate her technique.  We boiled a few extra potatoes the night before and before mashing them with the dinner potatoes, she set those aside and refrigerated them for the next morning.  She claims, it's important that you don't used mashed potatoes because they contain milk and butter, which doesn't make the best pancakes.  I'd agree with that too.. since I already tried that once before and it was a failure.

So here you go.. try them if you like.  British and Aussie food is often times a bit bland, so the flavor of these won't bowl you over, but if you like a traditional, old fashioned, stick-to-your-ribs kind of a dish, they are just perfect.  Serve them at breakfast or at dinner.  The only resemblance to pancakes is the shape, so don't let that stop you from making them anytime.  I think the addition of some chives would be really tasty.. even green onion, thinly sliced might be nice.  It's up to you!

Edna's Potato Pancakes

Potatoes, peeled, quartered and boiled
Salt & Pepper to taste
Plain, white flour
Oil for grilling

  1. Peel a few extra potatoes on a night when you're having mashed potatoes. For whatever reason, she told me you shouldn't use leftover mashed potatoes because the fat in them will cause your potato pancakes to become doughy when they are cooked. So, just boil a few extra, pull them out and refrigerate them until you're ready to make your pancakes.
  2. In a large bowl, smash your potatoes with a fork. Leave a few chunks in them. My husband swears that chunks of potato really make them tasty. Salt and pepper them to taste and add flour by the handful. Depending on how many potatoes you've cooked, add flour with your hands and knead and mix it in with the potatoes right in the bowl. Your dough should be slightly sticky, but hold together well enough to roll out on a generously floured surface. If your dough is sticking to your fingers or the surface, add more flour. Remember, they should taste like potato.. not flour, so gauging how much flour is enough is up to you.
  3. Potato pancakes are large.. like at least 8 inches in diameter. So pull off about a cup of the dough and roll it out with a rolling pin on a heavily floured surface. Keep lifting, turning and rotating the dough around to keep it from sticking. Roll them thin, no more than 1/8 to 1/4 inch thick.  You can get them too thick and they taste doughy.  Too thin and they don't cook properly.
  4. Heat an electric griddle to about 350 degrees. Add a few tablespoons of oil and let the griddle get hot. Add your pancakes and cook them for about 5-7 minutes each side. Check the underside for the right color. They should be golden brown. Flip them over, adding more oil if you need and continue to cook until they are golden on both sides. Transfer to a plate, spread some butter on them and enjoy. They are that simple.

Belles Hamburger Buns

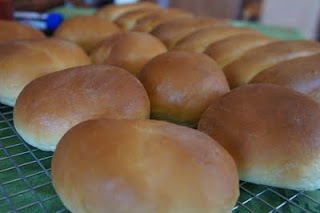
This recipe originated with my Grandmother, who was a camp cook for a summer camp in Montana. She would bake up dozens of these great little buns for the campers and I remember them with great fondness. She wrote down her recipe and since then, I've tweaked and modified it a bit. I now incorporate half all purpose and half bread flour. I find that this makes a "sturdier" bun without adding bulk or heaviness to it. They are light and fluffy, easy to make, they freeze well and you can shape them into anything you like - hot dog buns, sandwich rolls, dinner rolls, or whatever suits you. You can also top them with sesame or poppy seeds, everything bagel toppings, or just brush them with melted butter after they come out of the oven. The tops remain soft, while the bun is strong enough to hold up to the most messiest of toppings!

Today, I made a batch, but made half the recipe into Hot Dog buns. We picked up a package of European "Frankfurters" at Costco.. so this bun will be perfect. It is soft, tender and very ethereal. Yet, with all it's delicate crumb.. it holds up extremely well to a loaded burger with all the trimmings and even a Sloppy Joe.. these buns are beautiful and I've spent the last 5 years perfecting them.. I hope you enjoy them as much as our family does!

This recipe makes 16 rolls.. whether it be hamburger buns or hot dog buns.. get the longer hot dogs though.. these buns are perfect for them! Try the recipe in a New England Hot Dog pan.. use them for Lobster Rolls... oh endless! Oh delish!

Belles Hamburger Buns - Part Deux
Makes 16 Buns


6 ounces lukewarm water
6 ounces of lukewarm milk
2 large eggs
2 ounces butter, softened
2 ounces, sugar
4 teaspoons instant yeast
2 teaspoons salt
11.5 ounces Unbleached All-Purpose Flour
11.5 ounces Unbleached Bread Flour

For the topping
1 large egg, beaten with 1 TBS water
Your choice of sesame seeds, poppy seeds, the sky is the limit!
or
Brush the tops with melted butter after they are done baking.

Directions

1) To make the dough: Combine all of the dough ingredients, and mix to make a soft dough. Knead dough for about 8 minutes on medium speed of the Kitchen Aid using the dough hook. Dough should pass the window pane test.

2) Place the dough in a lightly greased bowl, cover, and let it rise in a warm place for an hour, until it's almost doubled in size.

3) Turn the dough out onto a lightly floured surface, remove all the big air bubbles with your fingertips, and divide it into 16 pieces - about 2.5 ounces each. I like to divide the dough in half, then half again, and half again.. and so on until you have 16 pieces. If you have a scale, take the time to weigh out the balls.. you don't have to be perfect but close enough.

4) For burger buns, roll each piece into a tight ball and using a floured hand, gently flatten them on a cookie sheet lined with parchment paper. Flatten them out and place them about 1.5 inches apart. Put 8 buns on a pan - using two pans. For Hot Dog buns, roll each piece out into a log.. about 8 inches long. Place them on a baking sheet lined with parchment paper.. about 3/4 inch apart.

6) Cover and let rise until the buns have doubled in size, about 40 minutes. Towards the end of the rising time, preheat the oven to 375°F.

7) If you want shiny tops or you want sesame seeds or other flavorings on the top of your buns, combine egg and water and lightly brush each bun. Sprinkle topping on immediately. I like to brush a bit of melted butter on the buns after they come out of the oven. This softens the tops nicely.. but it's totally up to you.

8) Bake the buns, one pan at a time for 10 minutes. Rotate the pan and bake for about 6 minutes more. Cool on a wire rack.

Saturday, April 21, 2012

Roaster Chicken Pot Pie

Comfort food at its finest!
You know.. for around $5.00, roaster chickens are a pretty good deal.  With just two of us here at home, we usually get a nice meal one night, and have chicken left over the next day.  I really love a good, roasted chicken and my favorite place to buy one is Costco.  Big, plump, juicy and flavorful, they really are a bargain.

This weekend, I decided to use the rest of our chicken and carcass for one of my husband's favorite meals - Chicken Pot Pie.  I LOVE a really good flavor for the gravy in a pot pie - not one of those pale yellow blobs that surrounds dried meat and veggies, but something hearty and rich.  The only thing that makes that type of broth is a Pressure Cooker.  Of course, you can do this same dish in a traditional pot, but you need to cook your carcass about 40 minutes to get the same effect.

Roaster Chicken Pot Pie

1 Whole Roaster Chicken with meat and skin pulled off the carcass
2 TBS olive oil
1 small onion, diced
2 stalks of celery, diced
1 tsp dried thyme
1/2 tsp poultry seasoning
Ground fresh pepper to taste
6 cups low sodium Chicken broth
1/2 cup half and half
4-5 medium potatoes, cut into 1 inch chunks
4 medium carrots, sliced into 1/2 inch slices
1 cup frozen peas
1 package frozen puff pastry, thawed
1 whole egg, beaten with 1 TBS water

After the pressure releases.. the broth is ethereal and rich!
  1. Carefully pull all the meat off the chicken carcass.  Peel back the skin and discard.  The skin is VERY salty and using it, while enhancing the flavor, will make your broth too salty.  Chop or pull chicken pieces apart, refrigerate until ready to use.  Break the carcass up into leg bones, thigh bones, break the breast piece in half.  Set aside.
  2. In a 6 or 8 quart Pressure Cooker, heat oil over medium heat.  For more information on Pressure Cookers, click here!  Add the onions and celery.  Saute together for about 8-10 minutes or until onion is soft.  Add the thyme, poultry seasoning and fresh pepper.  Stir for about 30 seconds until the flavors open in the spices.  Add the chicken broth and carcass.  Stir to combine.  Lock the lid in place and bring up to full pressure.  Reduce the heat to medium low and cook on full pressure for approximately 20 minutes.  Let the pot reduce the pressure on its own by removing it from the heat when finished.  (NOTE:  If you don't have a pressure cooker, use a dutch oven, but let the carcass simmer on low heat for about 40 minutes)
  3. In the meantime, bring potatoes and carrots to a boil with water or use any leftover chicken broth.  Let them simmer for about 10 minutes or until slightly tender.  Remove from heat and drain veggies.
  4. Preheat oven to 425 degrees.  When your pressure cooker has fully released, strain the broth through a strainer into a large bowl.  Discard the carcass, onion and celery. 
  5. Return the broth back to the pressure cooker and bring to a simmer.  Thicken with a slurry of cornstarch and water.  It depends on how thick you like your sauce, but I used about 1/3 cup of cornstarch and mixed it with water.  As my sauce simmered, I added it slowly - a little at a time until the desired thickness was reached.  Stir in half and half.  Stir in chicken chunks, potatoes, carrots and toss in the frozen peas.
  6. I used a deep dish pie plate and scooped the filling into the plate.  You can make individual ramekins or use a shallow casserole dish.  It's up to you.  If you have extra filling, you can freeze it or make another pot pie the following day.  (PS  My dogs LOVE this as a stew treat for dinner - without the puff pastry, of course.  They aren't THAT spoiled!)
  7. Unroll the puff pastry and if it needs to be larger, then roll it out gently with a rolling pin to suit your dish.  Let the edges drape over the sides of the dish.  You can brush egg white around the outside edge of your dish to help your pastry stick to the edges better.  Use the remaining egg white and brush your pastry all over.  Cut a few slits to allow the steam to release. 

Bake at 425 Degrees for approximately 25 minutes. 

Options:  You can top your pie with a traditional pie crust if you like, or perhaps biscuits is your preference.  You can even top with mashed potatoes for a chicken Shepherd's Pie.  If you use any of these other toppings, adjust your oven accordingly.

Also note, Roaster Chickens from the store are generally salty.  Taste test your broth for salt and enhance with more if you wish.

Pressure Cookers - nothing to worry about!


I thought I'd take a few minutes to blog about something I use in my kitchen constantly.  I actually have two pressure cookers and I use them in ways that continues to surprise me! 


Back in the "good old" days of Pressure Cookers, the wiggling and jiggling of the regulator was noisy, scary and yes - if unattended - could be dangerous.  Today's Pressure Cookers are nothing like their old, dusty cousins, thank goodness.  Today's Pressure Cookers are safe to use, but one thing that hasn't changed - they need to be tended, cajoled and a bit of coddling in the beginning of the cooking phase.  The result if you don't is scorched, burned or poorly pressured foods.

Yesterday, I wanted a nice, hearty chicken broth as the basis for my Chicken Pot Pie.  I make my Chicken Pot Pies out of a roaster chicken that I purchase at the store.  (Costco is, in my opinion, the best!).  I pull all the meat off the carcass, peel off the salty skin and use the bones and sinew as a basis for hearty stock.  In addition, I add some organic Chicken Stock to give it that extra flavor boost. 
After the pressure - a Chicken carcass after about 20 minutes!

Once the concoction comes up to Pressure, I turn down the heat and let it simmer for about 20 minutes.  The result is a beautiful broth, full of flavor and character.  The taste that is coaxed out of that roasted bone carcass is out of this world!

Which Pressure Cooker Is Best?

That's a personal choice.  My only recommendations would be that they are made from Stainless Steel, not aluminum (better heat, no fear of aluminum pan issues, etc).  Make sure that the pot is going to be large enough (or small enough) to be suited to most of your needs.  For example, I make alot of Risotto's, Pot Roasts, Beef Stews, Marinara sauce and broths with mine.  Therefore, I want a good sized one and that's why one of my Pressure Cookers is an 8 quart.  It seems a good size for just about anything.

I have a Fagor Pressure Cooker, which are made in Spain.  I love the tall, slender style of the pot, plus it has an easy to grab handle, much like that of a conventional saucepan.  The pressure workings are simple to figure out and it's easy to clean.  I also have a more expensive Magafesa, which is also stainless steel, made in Italy and a wee bit more expensive.  It's also a bit larger and the lid doesn't have a handle like the Fagor, but it came with a smaller pressure pot (perfect for sauces and risotto) and it came with a steamer basket - love to steam artichokes in 2/3 less time!  Each pot has its virtues and either one would be an excellent choice.

My advice is to start out with a modern Pressure cooker, make sure you select Stainless Steel, make sure it's at least 6 quarts (8 is probably average size) and it should have built-in safety features so there are no more worries of explosions in your kitchen.

What Are The Advantages of Pressure Cooking?

First, it's a huge time saver!!! It's perfect for a working family and you can adapt so many recipes to the Pressure Cooker.  You can save around 70% cooking time when using one and there is nothing like them to infuse flavor.  You can cook a raw, quartered chicken carcass in about 20 minutes.  The result is fall off the bone meat, and the broth is chock full of flavor and nutrition. 

The Science behind the Pressure Cooker.. it's pretty simple and SAFE!

I live in the Desert Southwest.. and it gets HOT in my kitchen during the summer months.  The Pressure Cooker is especially handy in weather like this - it uses far less energy and it keeps my kitchen cool. 

Cooking Under Pressure

Use the pot once and you're hooked.  I make delicious, creamy, tender Risotto in 7 minutes.. no kidding!  My husband is a Risotto fan and swears it is the best ever.  No more stirring, adding broth, stirring and adding broth.. it's all done for you under pressure.  How about Brown Rice in under 20 minutes, a pot of beans in 15 minutes.. no worries!

Less tender cuts of meats like Stew Meat or even Chuck Roast are fork tender in 20 minutes.  Chicken, Soups, and just about anything you can imagine are great for the Pressure Cooker. 

There are a growing number of great cookbooks to give you instructions and ideas about Cooking Under Pressure.. one of my favorites is called Ms. Vickie's Big Book of Pressure Cooker Recipes.  It's chock full of great recipes from Meat Sauce to Desserts.  Great for beginners and you can always adjust them to your liking.  Of course, don't forget to visit Ms. Vickie's website too.  It's loaded with recipes, tips for beginners and even cooker recommendations.  A must visit for any PC fan!

Saturday, February 19, 2011

Garlic Butter Bowknots

Buttery, soft and off the charts with garlic!
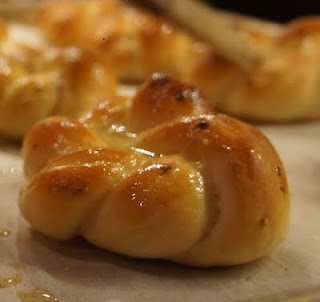
A few weeks back, I made some yummy Marinara and wanted to add something special on the side.  Tired of garlic bread, ciabatta's and the like, I wanted something unusual.  This roll recipe was that, and MORE!  Don't let the garlic amounts throw you.  I was skeptical at first, but decided to go for it.  So glad I did!  Who doesn't like garlic? 

These rolls really emphasize the flavor of the garlic in ways you can't imagine.  The flavor is not at all harsh or acidic.  It is not in the least bit offensive.. the taming of the garlic in the butter before mixing in the dough is really the secret to the ethereal and gorgeous flavor.  And the crumb... oh dear, the crumb!  This dough bakes up so soft, and has a delicate texture, a gorgeous chew - a bit like the tender dough in an Aunt Annie's pretzel (my very favorite!).  These are too easy to bake up.. and takes so little time, I wished I had known about these before!  Warning, however, the garlic essences will fill your house, your kitchen and you may just not be able to stop drooling!

Garlic Butter Bowknots
Makes 12 knots

10 garlic cloves, finely minced (You'll need about 3 full tablespoons of minced garlic)
6 tablespoons unsalted butter, divided
1 teaspoon plus 3/4 cup water , heated to 110 degrees
1 1/8 teaspoons instant or rapid-rise yeast
8-9 ounces all purpose flour (or 2 cups measured with the spoon and level method)
1 teaspoon table salt
Kosher flake salt for sprinkling on top.. or dried parmesan cheese

1.  Before you begin cooking anything, warm your oven to about 200 degrees, then shut off the oven.  Leave the door closed.  Prepare a large mixing bowl by spraying it lightly with PAM, or rub with oil.
The Garlic transforms from
acidic and bitter, to golden,
roasted and ethereal

2. Next, make the garlic butter.  Mince about 10 average size cloves of fresh garlic.  You'll want at least 2-3 full TBS of minced garlic.  In a sautee pan over medium low heat, melt 1 TBS of the butter and add 1 tsp of water.  When butter is melted, add the garlic and stir continuously, coating the garlic with butter.  Continue stirring and cooking for about 8-10 minutes or until the garlic takes on a straw coloring and the aroma is earthy.  Add the remaining 5 TBS of butter and swirl to melt in pan.  Allow this to cool for 10 minutes.  Using a fine mesh strainer, pour the butter and the garlic solids through the strainer into a small bowl.  Set aside the garlic solids - you'll want to add them to the dough.  Set butter aside in a separate bowl.

Proofing the dough.. see the garlic bits?  Mmmmm!
3. Now for the dough.  Whisk remaining water, 1 tablespoon of the melted garlic butter, all of the reserved garlic solids, and yeast in liquid measuring cup until yeast dissolves.  Don't worry about proofing the yeast. In bowl of stand mixer fitted with dough hook, mix flour and salt until combined. With mixer on low, add water/yeast/garlic mixture in steady stream and mix until dough comes together, about 1 minute. Scrape out all remaining bits of garlic.  Increase speed to medium and knead until dough is smooth and comes away from sides of bowl, about 6 minutes. If you need to add more water, add it a tsp at a time until the dough is fully incorporated and no longer appears dry.  Turn dough onto clean work surface and knead briefly to form smooth, cohesive ball, about 4-5 minutes or until dough passes the window pane test.  Transfer dough to prepared bowl and turn to coat. Cover with plastic wrap and place in turned-off oven until dough has doubled in size, 40 to 50 minutes.

4. SHAPE KNOTS Line a large baking sheet with parchment paper. Punch down dough gently on a lightly floured surface. Roll dough into 12- by 6-inch rectangle and cut into twelve 6-inch strips.  I found it easier to cut the dough in half.  Next, cut each half of dough into an additional half and then cut each of those half sections into thirds. With flat hands, roll each strip into 12-inch ropes. Tie the rope into a basic, single knot.   Then take one end of the dough and wrap it around and under the dough knot itself.  Tuck in the tip and push it up through the middle so the tip is exposed.  Take the other end of the dough and bring it OVER and tuck the end into the hole facing down.  Place on prepared baking sheet. Cover loosely with plastic wrap and return to turned-off oven until doubled in size, about 20 minutes.

5. Prepare oven for baking by removing knots from oven and discarding the plastic. Heat oven to 500 degrees and your rack should be just above the middle. Bake rolls until just set, about 5 minutes. Remove knots from oven and brush each with about 2 tablespoons garlic butter.  After brushing,  sprinkle the rolls with a bit of kosher flake salt and dried parmesan cheese if you wish.  Rotate the pan and return to oven, and bake until golden, about 5-6 minutes more.  As soon as rolls come out of the oven, brush knots with remaining garlic butter and cool 5 minutes in the pan.  Use all of the butter.  Serve warm, right out of the oven.  These are great to bake after your sauce and pasta are already cooked ahead of time.

Warm and inviting.. makes a dozen!

MAKE AHEAD Shaped knots can be refrigerated, covered, for 24 hours. Let sit at room temperature for 30 minutes. Meanwhile, heat oven to 200 degrees and turn off. Put knots in turned-off oven until doubled in size, about 20 minutes. Proceed with step 5.

Thursday, February 17, 2011

Brioche Croissants with Meyer Lemon Curd

These bake up in muffin cups and naturally form a well for the
lemon curd filling.  Top with a dusting of powdered sugar and
chilled whip cream.  Sublime!
I have had this recipe for years - you know, one of those snippets from a gourmet magazine that has turned yellow over time.  I've never made these, until now.  I have been in the mood for something lemony and decadant and I happened to remember seeing this recipe in a box of clippings that has literally, collected dust. 

The dough is a brioche style and while one could use it to make bread, these make lovely, ethereal croissants.  The recipe recommends any canned pie filling to be rolled up inside, but seriously.. a canned pie filling?  If I'm going to all the trouble to make a buttery, rich dough.. then I'm using something to fill it that is special.

I have a basket of Meyer Lemons on the counter and I've been using them in just about everything lately.  From Lemon Bread to Lemon Cookies, the Meyer Lemon lends itself perfectly to cooking - and making Limoncello!  I can't wait to get more.. my Limoncello recipe is gathering dust too!

This is a two-day dough... so plan ahead. 

Brioche Croissants
Makes 16

1 cup whole milk
1/4 cup sugar
4 large eggs, room temperature
3 1/2 cups of bread flour
1 TBS instant yeast
1 1/2 tsp salt
1 1/2 cups unsalted butter, room temperature
1 egg, beaten with 1 TBS water for egg wash
Powdered sugar for dusting

The day before - Warm milk over medium heat in saucepan until lukewarm.  In a large bowl, mix together the sugar and eggs thoroughly.  Slowly add one cup of flour and mix until smooth.  Add the egg mixture and continue beating together.  Add another cup of flour plus the instant yeast, continue mixing until the dough begings to come together.  Add the salt and about another half cup of the flour and continue to combine.  Speed 2 on your KitchenAid mixer is just perfect for this task!

Pour out the dough on a floured surface and knead in the remaining flour slowly.  Dough should be very sticky.  Knead for at least 3-4 minutes, keeping hands well-floured if necessary.  Use your KA dough hook if you wish.  Butter should be fully incorporated.

Wrap dough in plastic wrap and refrigerate overnight.  The next day, divide dough in half.  Wrap up the unused half and sprinkle your work surface and rolling pin with flour.  Roll out the dough to a 15 inch circle and using a pastry or pizza cutter, cut the dough into 8 triangles.

Cut a 1/2 inch notch in the top end of each wedge.  This will help the croissants roll up nice and neat.  Fill each croissant with about 1 1/2 TBS of curd or your favorite filling.  Roll each up slowly and place on a cookie sheet lined with parchment paper.  Make sure tips of the croissants are tucked under each roll.  Repeat with other half of dough.  Cover each cookie sheet loosely with plastic wrap.  Rest in a draft free spot for about 45 minutes.

Begin to preheat oven to 350 degrees after 45 minute rest.  Prep the first pan of rolls by brushing each roll gently with the egg wash.  Bake, one sheet at a time for 15-17 minutes, turning halfway through to brown evenly.  Rolls should be golden brown.

Remove from oven and cool on a wire rack.  Dust lightly with powdered sugar. 

Meyer Lemon Vanilla Curd
(Makes about 1.5 Cups)

4 whole Meyer Lemons (need 1/2 cup lemon juice)
1/2 cup sugar (increase to 3/4 cup if using regular lemons)
3 large eggs, room temperature
1/2 tsp vanilla
1/2 cup unsalted butter, cold

Prepare a large saucepan with water and bring to a simmer.  Lower heat to maintain a simmer, not a boil.

Grate enough zest from the lemons to get at least 2 TBS of zest.  Squeeze the juice to get 1/2 cup.  In a medium bowl, whisk the lemon juice and zest together.  Whisk in the sugar and eggs.  Cut butter into 4 or so pieces.  Add the butter and set the entire bowl over the simmering water.  Whisk continuously until the curd is thickened and reaches a temperature of 160 degrees farenheit.  This takes 5-8 minutes, usually.  Remove the bowl from the simmering water and using a fine-mesh sieve, run the curd through the sieve to remove any large bits or egg.  Cover the bowl loosely with plastic wrap and refrigerate until set.